
Knowing you need to take the GRE for grad school is easy, but figuring out where to begin isn’t always as simple.
In this article, we’ll cover everything you need to know about the GRE application process, including what kinds of information and materials you’ll need to gather before registration, how to apply for the GRE, and how to pay the GRE application fee. In addition, we’ll give you our top tips for ensuring a smooth and error-free GRE application experience.
What Do You Need to Apply for the GRE?
Before you apply for the GRE, be sure you have the following information and materials on hand.
Your Personal Information
This is pretty much a given and most likely you’ll already have most or all of this information memorized, but be prepared to give your personal information, including your full name (the same way it appears on the ID you’ll use on test day), date of birth, home address, email address, phone number, and social security number (optional).
The ID You’ll Use on Test Day
It’s a smart idea to take out the ID you’ll use on test day as you apply for the GRE. This way you can verify that your name on your ETS Account matches the spelling of your first and last names on your ID (excluding accents).
Quick side note: we've created the world's leading online GRE prep program that adapts to you and your strengths and weaknesses. Not sure what to study? Confused by how to improve your score? We give you minute by minute guide.
You don't NEED a prep program to get a great GRE score. But we believe PrepScholar is the best GRE prep program available right now, especially if you find it hard to organize your study schedule and don't know what to study.
Click here to learn how you can improve your GRE score by 7 points, guaranteed.
Acceptable forms of ID differ depending on the country, but generally valid passports and driver’s licenses are safe bets. ETS covers all ID requirements here.
Your Chosen Payment Method
At the end of the GRE application process, you must pay a $205 GRE application fee ($150 per GRE subject test). Most test takers pay this fee using either a major debit or credit card; thus, I recommend getting your card out ahead of time so you have all of the information ready once you get to the payment page.
If you’d prefer not to pay the GRE application fee by card, you may also pay by:
- PayPal
- eCheck service
- Money order, certified check, or voucher
For more information on how to pay for the GRE, go to the ETS website.
A Date or Time Frame for Taking the Exam
Choosing a date ahead of time isn’t a necessity, but it might help to have a rough idea as to when you’d like to take the GRE before you register for it. The computer-delivered GRE (the version most people take) is available year-round, so you should have a fairly wide array of potential test sessions from which to choose.
Don’t feel the need to rearrange your schedule to make room for the GRE. There are so many times and dates available that you shouldn’t have to shift any commitments around in order to take the test. For help with choosing a GRE test date, check out our expert tips.

How to Apply for the GRE: 4-Step Guide
In this section, we provide you with a step-by-step overview of the GRE application process. The following steps apply to both the computer-delivered GRE and the paper-delivered GRE, as well as all GRE subject tests.
Step 1: Make an ETS Account
First, make an ETS Account. (For those taking the GRE in China, make an NEEA Account instead.) Through this account, you can register for the GRE, view and print all of your GRE scores from the past five years, and make any changes to existing test reservations.
Click the “Create an Account” button located under the “New Users” section.
On the following page, input all of your personal information, including your name, date of birth, gender, contact information, and social security number (optional). As you do so, check that your name and birth date are correct — these must exactly match those on your ID.
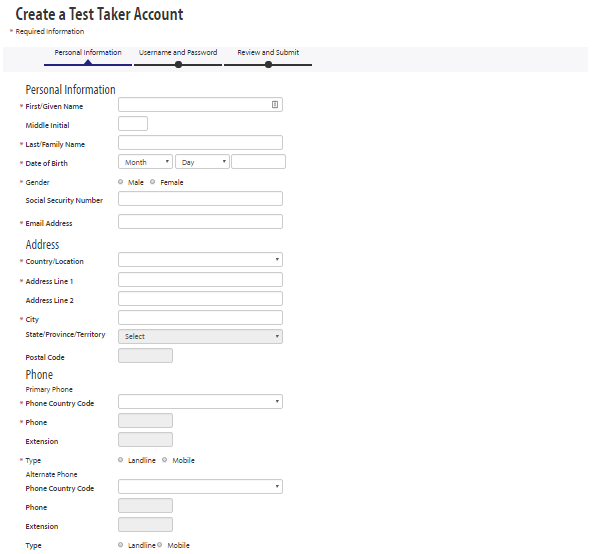
Once you’ve finished inputting all of your personal details, you’ll then get to create a username and password.
Finally, review and submit your details, and voila! Your account is ready to go. Now, you can begin the process of registering for the GRE.
Step 2: Find Available Test Centers and Dates
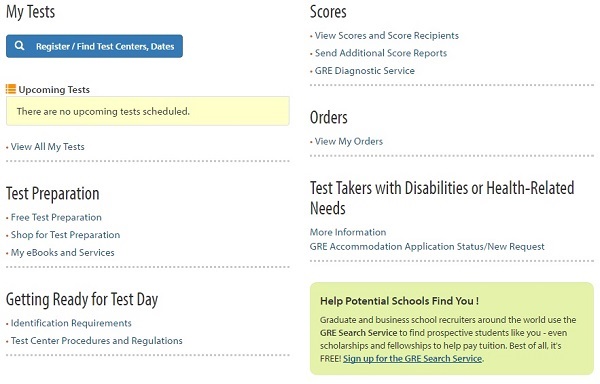
Once your ETS Account is all set up, log on to get to a homepage titled “My GRE Home.” On this page, click “Register / Find Test Centers, Dates” in the top-left corner:
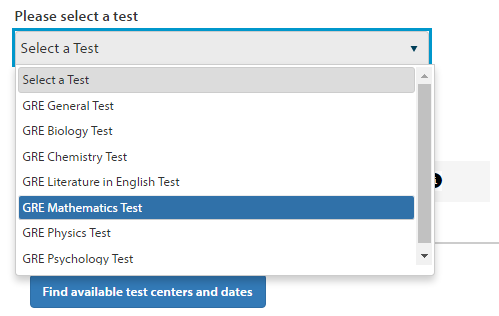
From here, you’ll search for GRE test centers and dates. Start by selecting the test you plan to take from the drop-down list (most people will choose the “GRE General Test” unless registering for a GRE subject test).
Next, look for test centers closest to you by typing in your home address (or, alternatively, your city, state, or country). The more specific you are in terms of location, the better your results will be.
Here’s what I mean by this: if you were to search for test centers near your home address, you’d get a map of test centers with their distances to your exact location. But if you were to search for test centers in a big city like Houston, you’d instead get a map of test centers with their distances to the city center — which obviously isn’t nearly as helpful to you!
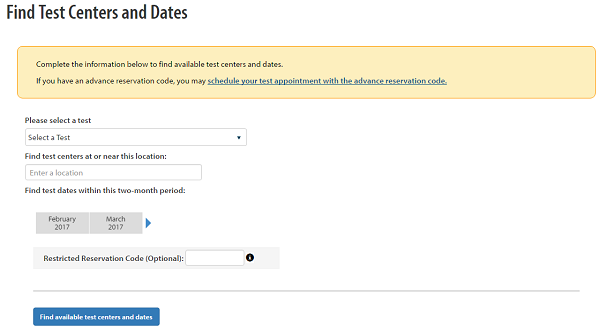
The last thing you’ll do on this page is choose a two-month span for which you’ll be looking for test centers and dates. Note that you can register for the GRE up to a year in advance but no later than two days before your desired test date.
Once finished, click “Find available test centers and dates” to continue to a map of your location and the nearest test centers (for the two-month span you’ve selected). If you were to search for GRE test locations and dates for Los Angeles, for example, your page would look something like this:
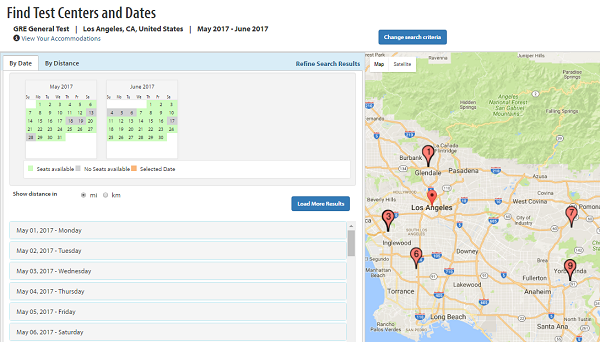
On this page, you can browse GRE sessions by date or distance (using the tabs at the top). Clicking a date will reveal all available test centers for that day. You can then click “Show Test Times” to look at individual times and seating availability:
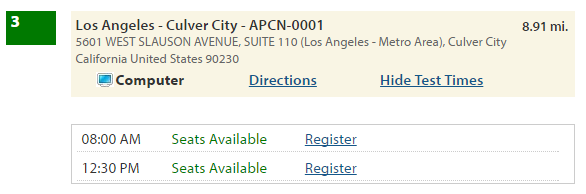
I suggest using the map to help you gauge where certain test centers are situated and how far they are from your location. Alternatively, if you click “Directions” for a specific test center, you’ll bring up a Google Maps tab showing you all possible routes from that test center to whatever address or city you input on the previous page.
In the end, be sure to select a test center, date, and time that’ll work well for you. Always take into account factors such as time of day (you’ll likely want to avoid rush-hour traffic) and distance from your location so you can plan accordingly.
Additionally, note that seats are available on a first-come, first-served basis, so the earlier you register, the better chance you’ll have of getting the test session you want!

Want to improve your GRE score by 7 points? We have the industry's leading GRE prep program. Built by world-class instructors with 99th percentile GRE scores, the program learns your strengths and weaknesses through machine learning data science, then customizes your prep program to you so you get the most effective prep possible.
Try our 5-day full access trial for free:
Step 3: Verify Your Registration Details
Once you click “Register” for a desired test session, you’ll confirm your test center, date, and time before agreeing to the ETS testing policies.
After, you’ll need to click through a bunch of (mostly extraneous) pages before you can pay the GRE application fee. These pages will instruct you to do the following:
- Review your personal information.
- Decide whether you’d like to enroll in the free GRE Search Service. This service allows universities to contact you about programs and special funding opportunities. (Be aware: some people consider this service highly spammy, so think deeply about whether it’ll be useful to you before agreeing to participate.)
- Input background information. This page will ask you for a ton of background information, but you don’t have to answer every question — just the ones with red asterisks next to them. All of the information on this page will be used for research/statistics and GRE Search Service purposes only. If you’re not comfortable filling everything out, you’re not obligated to do so.
- Select any test preparation materials you wish to purchase. This final page is basically just an ETS ad trying to entice you to buy official GRE study materials. Personally, I wouldn’t bother buying anything on this page since Amazon usually sells ETS materials at a far cheaper price. (For example, The Official Guide costs $40 through the ETS store but only about $20-25 on Amazon!) Moreover, you can find tons of free official GRE materials online, including sample questions and practice tests.
Step 4: Pay the GRE Application Fee
Almost there! Now that you’ve successfully traversed the bulk of the GRE application process, it’s time to check out and pay the GRE application fee. As a reminder, the GRE costs $205 ($150 per GRE subject test), which most people pay for using a credit or debit card. (ETS lists additional forms of accepted payment methods here.)
Here’s what your cart will look like:
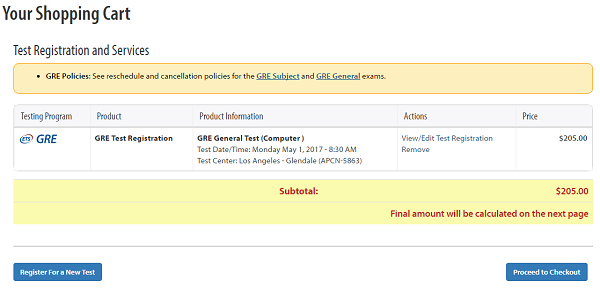
Once you’ve paid for the test, you’ll receive a confirmation email containing your exam date, time, test center address, and confirmation number. (You can also access this information by logging on to your ETS Account and viewing your current reservations.) And that’s it — you’re done!

Additional Methods for GRE Registration
Although the quickest and easiest way to register for the GRE is to go online to your ETS Account (or NEEA Account if you’re in China), you may also register for the GRE by phone. Contact information and procedures vary depending on your country of residence.
Those located in the U.S., U.S. territories, or Canada may either contact their chosen test center or call Prometric services at 1-443-751-4820 or 1-800-473-2255. If registering by phone, make sure you call at least two full business days before your desired test date. You may pay the exam fee by debit or credit card, eCheck, or voucher number. To pay with a paper check or money order, you must first request an Authorization Voucher by mail.
As you register over the phone, you’ll get a confirmation number, time, date, and test center. Write all of this information down — you’ll need it on test day or if you’d like to make any changes to your reservation.
For those located outside the U.S. and Canada, call your Regional Registration Center (RRC) at least two full business days before your desired test date. Note that test takers in China may only register online through their NEEA Accounts. Likewise, test takers in Korea, Taiwan, and Hong Kong may only register online through their ETS Accounts.
How to Apply for the GRE Paper Test
Before we explain the registration process for the paper version of the GRE, note that the paper GRE is only administered in areas where the computer GRE is unavailable (or if you’ve received approval for special testing conditions). In other words, you can’t simply choose to take the paper GRE in place of the computer GRE.
But how do you know which version of the test you’ll be taking? For one, the vast majority of test takers — 98 percent, to be exact — take the computer GRE, meaning you’ll most likely not take the paper GRE.
For a clearer answer to this question, though, refer to the official paper-delivered GRE test center list, or follow the steps above and look for a “Paper” indication next to your preferred test date and time. (A computer test will have a “Computer” indication, which you can see in the last screenshot in step 2.)
If you do have to take the paper GRE, the easiest way to register for it is to log on to your ETS Account and follow the steps above. The only major difference is that you’ll have far fewer test dates than you would if you were taking the computer GRE. This is because the paper GRE is only administered up to three times a year (whereas the computer GRE is available year-round). Our updated guide summarizes everything you need to know about upcoming paper GRE test dates.
You may also register for the paper GRE by mail. To do so, download the GRE registration form and mail it and your $205 application fee to ETS using the address listed on the form by the appropriate registration deadline. Note that registration requests by mail typically take four weeks to process.
How to Apply for a GRE Subject Test
GRE subject tests are similar to the paper GRE in that they’re paper-delivered tests administered up to three times a year. For more information on where you can take a GRE subject test, consult pages 3-9 of the official list of paper-delivered GRE test centers.
To register for a GRE subject test, follow the steps above through your ETS Account. On the page where you input your location and designate a test, select the name of the GRE subject test you’ll be taking — not “GRE general test” — from the drop-down list:
Like the paper GRE, you may also register for a GRE subject test by mail. Send the GRE subject test registration form, along with your payment of $150, to ETS using the address printed on the form. It’ll take about four weeks to process your request.

Top 3 Tips for Ensuring a Smooth GRE Application Process
Registering for the GRE isn’t a particularly complicated procedure, but it’s important you avoid making any major mistakes as you apply. Here, we present to you our top three tips for ensuring your GRE application proceeds as smoothly as possible.
#1: Check and Double-Check Your Name
As you create your ETS Account and follow the steps above to apply for the GRE, check and double-check that your first and last names are spelled correctly and that they match the spellings of your names on the ID you’ll be bringing on test day. All spellings must be exact, excluding any accent marks.
ETS is extremely strict about ID requirements, so if there ends up being any error or misspelling of your name when you go to take the test, you will not be able to solve the dispute using additional forms of ID. Instead, the test center will simply turn you away without giving you any refund for the test!
As I mentioned previously, ID requirements vary by country. That said, the general requirements for an acceptable ID are as follows:
- Must be an original document (such as a license or a passport) — absolutely no photocopies!
- Must be valid — expired documents are not permitted
- Must contain your full name as it is written on your GRE registration (excluding accents)
- Must include a (recent) photograph
- Must include your signature
#2: Choose a Date and Time That’ll Work for You
While registering for the GRE, it’s important you choose a date and time that’ll work well for you so you can avoid having to pay the $50 fee to change your test date.
Before you register, take out a calendar and make a note of any ideal dates or time frames. If you don’t want to leave for the test during rush hour, for example, opt for a test session sometime in the afternoon. Or if you’d prefer to have more study time, pick a test session at least three or four months away (especially if you think you’ll want to retake the exam, too).
Also, always give your schools enough time to receive and process your GRE scores before applications are due. ETS sends official GRE scores to schools 10-15 days after test day (five weeks after test day for the paper GRE).
Want to improve your GRE score by 7+ points?
Check out our best-in-class online GRE prep program. We guarantee your money back if you don't improve your GRE score by 7 points or more.
PrepScholar GRE is entirely online, and it customizes your prep program to your strengths and weaknesses. We also feature 2,000 practice questions, official practice tests, 150 hours of interactive lessons, and 1-on-1 scoring and feedback on your AWA essays.
Check out our 5-day free trial now:
#3: See Whether You’re Eligible for a Discount
Not everyone will have time to do this, but if you’re hoping to save money on the GRE, make sure you consider all of your options before registering for the exam. ETS offers a Fee Reduction Program in the form of a 50 percent discount on any GRE test (so $102.50 off the general GRE and $75 off a GRE subject test). These programs are only open to U.S. citizens and permanent residents.
The three fee reduction programs available target test takers who meet one of the following requirements:
- Have demonstrated financial need
- Are unemployed and currently receiving unemployment compensation
- Are members of select national programs that work with underrepresented groups
Here’s the catch: the application requirements for these programs are quite strict. Furthermore, it’ll take at least three weeks to process your request for a fee waiver (and that’s not even including the time it’ll take you to get the application materials). So if you’ve got your heart set on securing a GRE fee reduction, make sure you set aside plenty of time — at least a month or so — to complete the process.

Recap: The GRE Application Process
In order to take the GRE, you must first register for the exam and pay a $205 GRE application fee. The most convenient way to apply for the GRE is to create an ETS Account (or an NEEA Account for those in China). You may also register for the GRE by calling Prometric services or the appropriate Regional Registration Center (RRC).
Before you register for the GRE, get out the ID you’ll use on test day so you can confirm that you’ve input your full name and date of birth correctly on your GRE registration. In addition, have your preferred payment method on hand and decide on a rough time frame or an exact date for when you’d like to take the test.
To help your GRE registration process proceed as smoothly as possible, check and double-check your name, choose a date and time that’ll work well for you, and determine whether you’re eligible for a GRE fee waiver.
Now, all that’s left to do is ace the GRE!
What’s Next?
What is the GRE? What is its purpose? Our guides tell you everything you need to know about the GRE, including what kind of content it tests and why so many aspiring grad students take the exam.
Got questions? Let us answer them! Take a look at our extensive GRE FAQ and use our GRE help page to get all of the advice and guidance you need for your GRE studies.
Ready to improve your GRE score by 7 points?
We've written a eBook about the top 5 strategies you must be using to have a shot at improving your GRE score.
Download it for free now: