
Interested in taking the GRE? The registration process may seem complicated, but once you understand the steps, it’s actually pretty straightforward. GRE testing spots can fill up quickly, so you want to make sure you understand how to sign up for a test date sooner rather than later so you can get your preferred testing location and date, and so that you’ll have enough time to send your scores to the schools of your choice.
In this guide, I’ll walk you through all the steps for the General GRE registration. I’ll also go over differences international students need to know before they sign up, how to register for GRE Subject Tests, and how to register for the GRE by mail.
How to Register for the GRE in 3 Simple Steps
Here I’ll take you through the full GRE registration process. This section explains how to register for a test center in the US, but most of the information is true for international test-takers as well. If you’ll be taking the GRE outside of the United States, read this section first, then look for your country in the next section to see if there are any additional registration guidelines you need to know about.
Step 1: Set Up Your “My GRE” Account
The first step you need to take is to create a My GRE Account. You’ll use this account to register for the GRE, view your scores, and send score reports to schools.
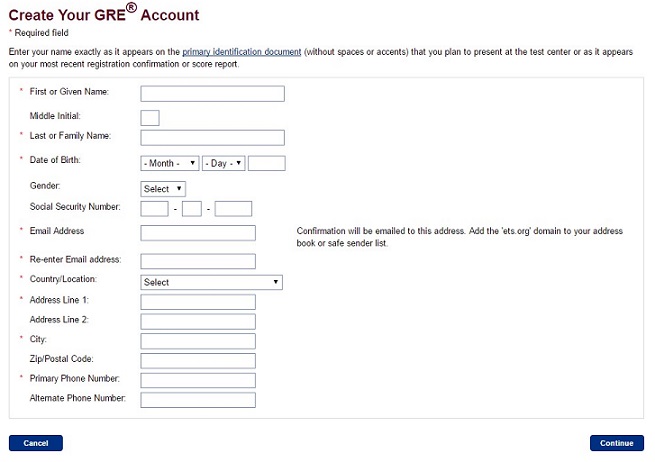
Creating an account is a short process and mostly involves inputting some basic information such as your name, email, and home address. Pay attention when entering your name and birthdate. Both of these must match exactly the ID you bring with you to test day, and you won’t be able to change them after you complete your account registration.
This is the main page you’ll see when you create your account:
Quick side note: we've created the world's leading online GRE prep program that adapts to you and your strengths and weaknesses. Not sure what to study? Confused by how to improve your score? We give you minute by minute guide.
You don't NEED a prep program to get a great GRE score. But we believe PrepScholar is the best GRE prep program available right now, especially if you find it hard to organize your study schedule and don't know what to study.
Click here to learn how you can improve your GRE score by 7 points, guaranteed.
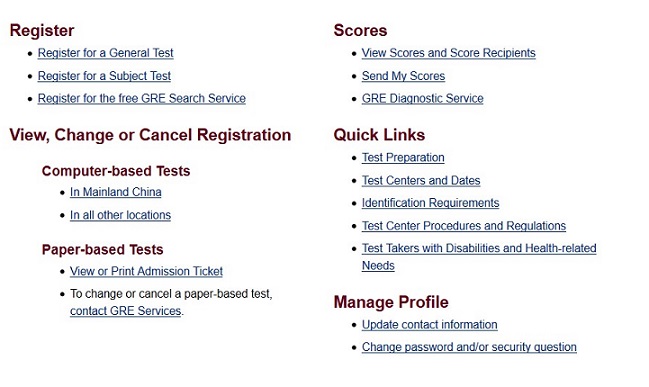
Once you have your account set up, you can search for test date availability and register for a particular test date.
On the main page of your My GRE Home, look under “Register” and click “Register for a General Test” (I’ll go over how to register for a Subject Test later in this guide).
Step 2: Choose a Test Center Location and Test Date
Next, select the country where you’ll take the GRE. After you’ve selected your country, state, and city, a list of testing centers and their addresses will show up. You can’t click on any of them though; instead, click “Continue to Seat Selection” in order to select your desired testing center.
You’ll be sent to a page with a bunch of test policy information, such as when to arrive at the testing center and what to bring (you can always come back and review this information later). There is also an important note in red telling you that once you’ve selected a date and test center, you’ll have 20 minutes to complete your registration or it will be canceled.
Click the “Next” button, then enter your address or part of your address into the search bar. The locations of the closest test centers will pop up. Here’s what this looks like if you enter “Chicago” as your address:
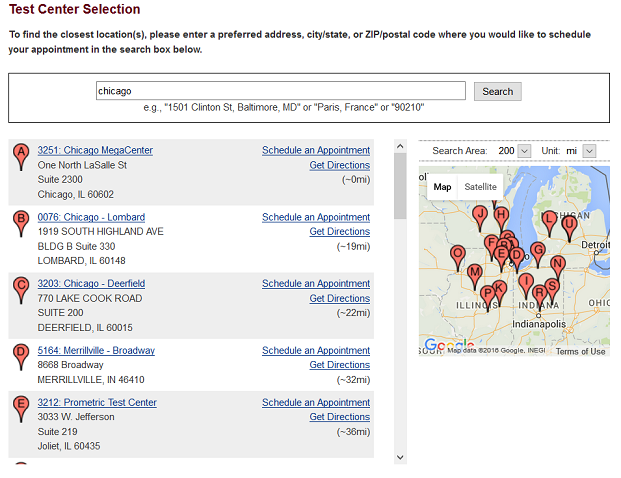
Look through the different locations to find the one which works best for you. (There’s also a little map on the right you can look to get a better idea of the testing center locations. If there are too few testing centers for you, or too many (as is the case above), directly above the map you can increase or decrease the size of the search area. Once you’ve found your ideal test center location, click “Schedule an Appointment.”
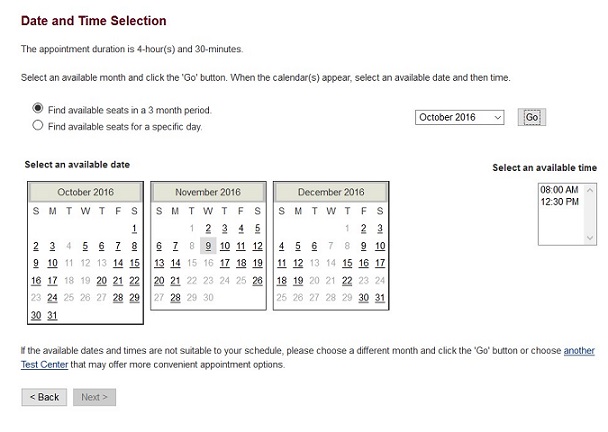
You can either see which dates are available over a three-month period or select a specific date to see if your chosen testing center is available that day. Available dates will be underlined and in black. Click on any of them to what times are available. There are often both morning and afternoon time slots. As it reminds you on the webpage, your “appointment” will last 4.5 hours because that’s how long it takes to get set up in the testing center and complete the GRE. So, if you select an 8:00am time slot, you’ll be there until about 12:30pm.
Step 3: Complete GRE Registration
After you’ve selected the date and time you want, click “Next”. The next page will have a bunch of questions you’re asked to answer, but the only ones you’re required to complete are the handful with the red asterisk next to them. Leaving the other questions unanswered will have no impact on your GRE score; they only matter if you’re using the GRE Search Service to have information about different grad schools sent to you. (At the bottom of this page is where you agree or decline to register for GRE Search Service).
You’ll then be directed to the payment page. It costs $205 to take the GRE. This fee can be paid with any major credit or debit card (except in Nigeria where only VISA and PayPal are accepted.) On the next page, you’ll review the information you submitted and confirm your testing appointment.
Once your registration has been processed, you’ll receive an email telling you that your admission ticket is available on your My GRE account. Be sure to print this off and bring it with you on test day (along with an approved ID), otherwise you won’t be able to take the test. (It will also be saved on your My GRE account if you want to print it off later).
Your GRE fee includes four free score reports. You don’t select which schools you want to send your scores to during registration, however; this is done at the testing center after you’ve completed the exam and viewed your unofficial Quantitative Reasoning and Verbal Reasoning Scores.
Differences in GRE Registration for Students Outside of the US
Many students take the GRE outside of the United States but, luckily, the registration process is generally still the same regardless of which country you’re taking the GRE in. Below are the seven most common countries to take the GRE in outside of the United States and differences in registration those countries have.
For all countries, be aware that there is often less availability for test dates and times than there is in the United States, so you’ll want to begin thinking about registration at least several weeks before you plan to take the GRE in order to increase your chances of getting your top testing center and date.
India
For students registering to take the GRE in India, the process is almost exactly the same as the steps outlined above.
One small difference is that, after selecting your test center and before viewing the dates that are available, you’ll often see a page where you’ll have to agree to a biometric enabled check-in. (Whether or not you see this page depends on which test center you’ve chosen, since not all use biometric testing).
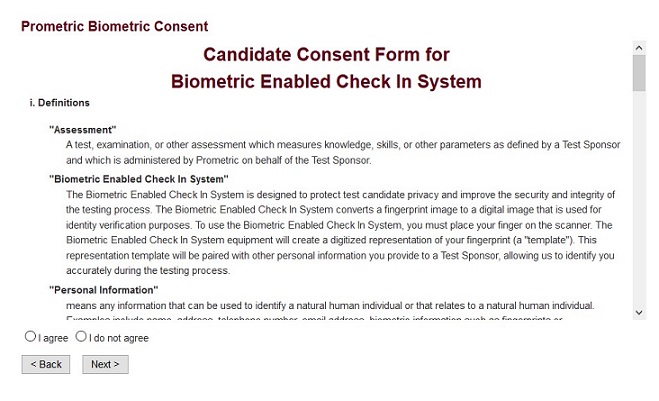
This page just means that you agree to have your fingerprints scanned when you arrive at the test center on test day. This is used as a way to confirm your identify and reduce cheating on the exam.
Mainland China
People taking the test in China need to register through the National Education Examinations Authority (NEEA). You’ll be directed to this site from the GRE registration page, and there you’ll need to create an NEEA ID and password (the NEEA website is available in both English and Mandarin).
After you create an NEEA account, you’ll be assigned an NEEA ID and an ETS ID. Before you can register for the GRE, you need to deposit money into your NEEA account.
In addition to a longer and more complicated registration process, people taking the GRE in China also have to pay more for the test. The cost is $220.70 (¥1456.00), compared to $205 for the rest of the world.
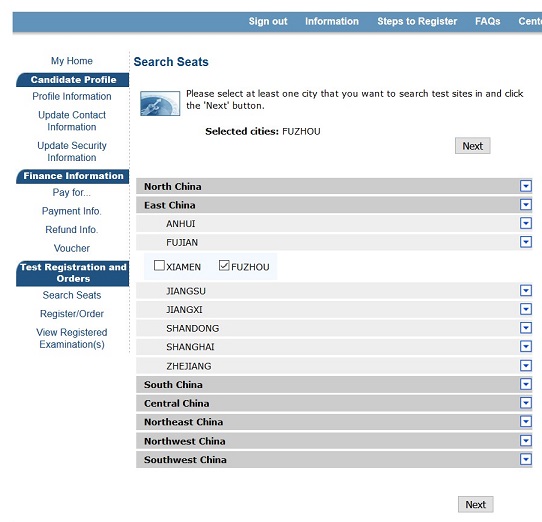
After you have deposited sufficient money in your NEEA account, you’ll be able to select a test center and test date similar to above by clicking “Register/Order” on the left side of the page. It is possible to view which test centers and test dates are available before depositing money. Click “Search Seats” on the left side of the page, then select your region to see what options are available to you.
Saudi Arabia
The GRE registration process for people taking the test in Saudi Arabia is the same as it is for people taking it in the US. Be aware, however, that most testing centers are segregated by gender, so be sure to choose the appropriate one (i.e. Riyadh Women or Riyadh Men).
Korea, Iran, Canada, and Nigeria
If you are registering to take the GRE in Korea, Iran, Canada, or Nigeria, the registration process is the same as when registering to take the test in the US, so just follow the instructions in the section above.
How to Register for the Paper Version of the GRE
The first thing to know about the paper version of the General GRE is that it’s only offered in places where the computer version isn’t available, or if you’ve been approved for special test conditions. You can’t simply decide you’d prefer to take the GRE with pencil and paper as opposed to on the computer. Because there are many computer test centers available around the world, only a small percentage of people take a paper version of the General GRE. Here’s a list of all the paper-based testing centers.
Want to improve your GRE score by 7 points? We have the industry's leading GRE prep program. Built by world-class instructors with 99th percentile GRE scores, the program learns your strengths and weaknesses through machine learning data science, then customizes your prep program to you so you get the most effective prep possible.
Try our 5-day full access trial for free:
The registration process for the paper version is similar to the process described above. The major difference is that paper exams are only offered three times a year (typically in September, October, and April), so test spots are much more limited and registration is only available at certain times of the year.
You will still register on your My GRE account homepage and follow the steps described above. It’s also possible to register via mail. To do this, you have to complete the registration form and mail it to the address listed on the form, along with a check or credit card information. Allow about four weeks for processing, after which you’ll be emailed your admission ticket.
How to Register for a GRE Subject Test
GRE Subject Tests are only taken with paper and pencil and are offered three times a year, on the same dates as the paper version of the General GRE (in September, October, and April). You can’t take Subject Tests on the computer so, like for the paper version of the General GRE, test spots are limited, and registration is only open certain times of the year.
To register for a Subject Test, go to your My GRE homepage and click “Register for a Subject Test”. After confirming your personal information, you’ll be able to see if registration is currently available. If it is, you’ll next select which Subject Test you’re interested in taking.
You can then find an available seat by either searching best test center or searching by test date. Registration then follows steps similar to those when registering for the General GRE.
3 Common GRE Registration Issues and How to Resolve Them
So you’ve completed the GRE sign up process, but now you’ve realized you made a mistake! Don’t panic; there are simple fixes for most of the common problems.
#1: You Entered Information Incorrectly
You can edit most of your personal and contact information that you enter when you complete your My GRE account and complete your registration, however; once you submit your name and birthdate, these cannot be changed later on.
Therefore, be very careful when entering these because they must exactly match the ID you bring with you to the exam, or you won’t be allowed to take the GRE and will have to cancel and reregister. (You can try calling your test center to see if they’ll allow you to test. However, ETS’s official policy forbids it, so even if they say yes there’s a chance you’ll get turned away on the day of.)
#2: You Need to Cancel Your Registration
If you need to alter your test place or time, or cancel your registration, first go to your My GRE homepage. Under “View, Change, or Cancel Registration”, you’ll select if you’re from mainland China or a different country.
For most countries, you’ll see on the next page ways to change your exam date and/or location online or over the phone. If you’re in China, you’ll have to complete this information through the NEEA. The cost for making this change is $50.
Cancelling your registration follows the same process as changing it, and it can also be done either online or over the phone. For both of these processes you’ll need your Confirmation/Tracking Number (which you will have received via email and is also available if you log into your My GRE account). If you cancel your exam more than four days before the test date, you’ll receive a 50% refund, but if you cancel less than four days ahead, there is no refund.
#3: You Want to Take the GRE Again
If you’re unhappy with your scores or just want to see if you can do better, it’s possible (and quite common) to retake the GRE multiple times. You can take the GRE up to five times within a 12-month period, as long as the last time you took the GRE was at least 21 days ago.
Each time you take the GRE, you can choose which scores you’d like to be sent to schools. This means that, if you’ve taken the GRE three times, you can choose to send only your most recent scores to schools, or only your second scores, or all scores, etc.

After viewing your scores, you may want to take the GRE again.
What You Need to Know to Sign Up for the GRE
If you’re interested in taking the GRE the first step, no matter which country you’ll be taking the test in, is to create a My GRE account. After you’ve setup your account, you’ll be able to view test dates and testing center locations and register for an exam.
If you will be taking the GRE outside the United States, the registration process will typically have minor or no differences than if you were registering to take the test within the US. The major exception is mainland China, where people interested in taking the GRE must register through NEEA. Generally, exam centers outside of the United States also often have significantly fewer seats and test dates available, so be sure to register early.
If you’re interested in taking a GRE Subject Test, you will also start this process by logging into your My GRE account. Remember that Subject Tests are taken with paper and pencil, not on the computer, so they are only offered three times a year, and registration is not always open.
You can also change or cancel your registration through your My GRE account. Fees will apply for both of these processes.
What’s Next?
Still looking for more information on the GRE? Check out our comprehensive guide to the GRE, including what skills it tests, how it’s formatted, and how important it is for grad school.
Wondering how your GRE score is calculated? Our guide explains how the GRE is scored, what adaptive scoring is, and which GRE questions have a much bigger impact on your final score than others.
What score should you be aiming for? Check out our guide to what a good GRE score is and learn how to develop your own score goals.
Ready to improve your GRE score by 7 points?
We've written a eBook about the top 5 strategies you must be using to have a shot at improving your GRE score.
Download it for free now:

